Tooling utilities
Botcha offers several tools to help with the creation of details in tooling. Here we present how these tools work.
Digital textures
This tool allows you to import images into Botcha and use them as displacement textures for your geometries.
What is a Digital Texture?
A digital texture in Botcha is a powerful feature that lets you quickly apply an image as a displacement map on a mesh that has UV coordinates. Below are the key parameters you can control:
- Width and Height: These define the size of the digital texture. The aspect ratio between width and height will always remain the same, ensuring that the image is not distorted when applied to the mesh.
- Black and White: These parameters control how specific points in the image translate into deformations on the mesh. For instance, by adjusting the black value to -0.15, the black areas of the image will move the mesh's vertices downward by 0.15 mm. Conversely, if the white value is set to +0.15, the white areas of the image will raise the mesh's vertices by 0.15 mm. Intermediate shades of gray will create proportional deformations. The greater the contrast between the black and white values, the more pronounced the displacement.
- Rotation: Adjust the rotation of the texture on the mesh.
- Subdivisions and Export subdivisions: To visualize the displacement effect with sufficient detail, refining the mesh is crucial. You can specify the number of subdivisions to apply to the original mesh to enhance visual quality. Additionally, you can set a higher subdivision count for the exported geometry, ensuring a more detailed displaced mesh in the output file without impacting performance in Rhino.
- Fade edges: By default, displacement at the edges drops to 0 immediately. To create a smoother transition, you can set a fading value, which represents the width (in millimeters) of the fade region.
- Preview mode: Preview the digital texture on the object's surface without modifying its geometry. This is done by applying a material with the texture to the object. Simply click the lens icon at the top-right of the digital texture modifier to toggle this mode.

A digital texture with a large fading region applied to a shoe heel, displacement, and preview mode.

Once applied, digital textures will appear in the object's modifier page.
Advanced applications
During the digital texture application, some files are generated for advanced workflows. These are stored in the DT_Cache folder inside the Rhino document folder. For each digital texture, you will find the following .png files:
- Mask file: Defines the displacement region. The mask is smoothed based on the UV outline of connected regions.
The mask resolution is tied to the UV editor canvas size. It also depends on the Fade Pixel Size, which you can set in Botcha’s options,
representing the quantity of model length (for example, millimeters) represented by a pixel in the output
.pngfile.
Editing this mask will update the displacement effect. You can also obtain a mask file directly with theB_ExportFadingcommand. If fading is disabled, the mask is completely white. - Texture file: This is the image used for the material in preview mode. If fading is enabled, the mesh outline will appear on this texture. Editing the texture file will directly update the preview material and its appearance on the mesh.
Note
You can easily set the default behavior from the BotchaOptions section in the Rhino Options window by changing the default view mode, the material image resolution, and the mask pixel size. It is also possible to change the default white and black values used when not explicitly defined in the texture file name.

The digital texture displacement after editing the mask.png file manually.
Digital textures panel
The panel allows you to:
- Import digital textures: You can import
.png,.jpg, or.jpegfiles to build your library of digital textures. You can also select a.zipfile, and all the images inside will be imported automatically. The file name plays a key role in determining the default parameters for the texture. Letters like "X" and "Y" represent texture dimensions, while "W" and "B" represent the white and black levels. For example, an image namedBotchaDigitalTextureX14.9Y12.2W0.15B-0.16.pngwill be read as a texture with a width of 14.9 mm, height of 12.2 mm, and default black and white levels of -0.16 and +0.15, respectively. - Apply digital textures to meshes: Applying textures is easy—just double-click on a digital texture to select the object where you want the displacement to appear.
- Edit a digital texture: Right-click on a digital texture name and a window will open, allowing you to change the size, the name, and the default black and white values.

The digital texture panel showcasing a variety of textures and their default values.
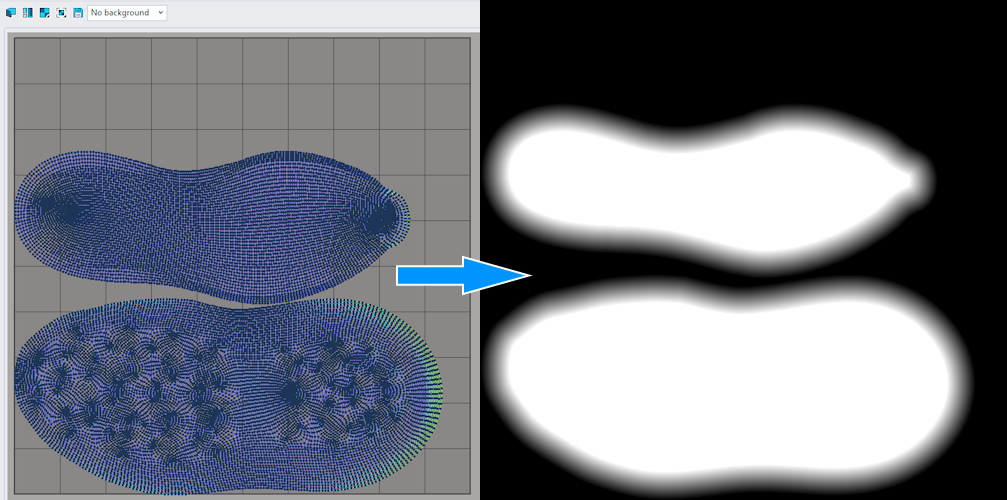
B_ExportFading
This command allows you to export the UV outlines of an object as a .png image file. The resulting map features a white interior within the UV boundaries and a black exterior.
Key Settings:
- Fade Amount: Controls the gradient width along the outline, allowing for a smooth transition from white to black.
-
Save Mode: When processing multiple objects simultaneously, you can choose how the files are generated:
- Separate: Creates a dedicated folder containing an individual file for each object.
- Combine: Merges all UV outlines into a single image file.
B_BlueprintGen
Generates a tooling blueprint based on your specifications, similar to the one shown below:

Once the command is executed, a configuration window will appear, allowing you to fully customize your blueprint with the following options:
- Set views: Choose which views of the tooling you want displayed and assign custom names to each view.
-
Set sections: Define the section lines you need and specify their type, either Longitudinal or Cross. You can also rename each section.

-
Set title and revision blocks: Opt to include title and revision block templates in your blueprint and easily set placeholder values for them. These templates are imported from a .3dm file located in your AppData folder, distributed with Botcha. If needed, you can modify the title and revision blocks using the B_BlueprintEditTemplate command. Any changes made are stored in the corresponding template layers. To revert back to the default template, simply use B_BlueprintRestoreTemplate.

Text enclosed in % symbols will be treated as placeholders, automatically replaced with the values you input in the configuration window.