Simple part creation
In this chapter we are going to discuss how to create parts around a last that we prepared and unwrapped previously. We will assume that you have already covered the previous chapters about last prepping and image projection.
We will start from a projected image to trace out our parts. We want to do is to create curves that will be used for creating our parts. We want to use the reference we have to isolate the various pieces we will model and overlap.

Create action groups
To model our parts quickly and keep some connection between the 2D and 3D we want to create a couple of actions. You can find the action panel in the panels in Rhino.
Info
Actions are working similar to modifiers for the whole document. They will automatically update every time an object that is captured by the action is modified. Unlike modifiers actions will create object that are persistent in the document.
In our example we are creating two actions: one for the vamp remapping and one for the heel remapping. In general it is preferred to act on multiple actions for remapping in these cases, if the remapping happens too close to a seam the results may not be the best.

Tip
When creating remap actions (or using the remap command) it is preferable to use the skinning
strategy as it performs faster but require meshes that are topologically identical.
Create parts with modifiers
Once we have our curves that represent our parts we can use either direct modelling of each part,
subD modelling or the B_PlanarQuadMesh ![]() for
filling each curve with a planar mesh. We want then to use the soft editing to give the desired results
for overlaps and paddings.
for
filling each curve with a planar mesh. We want then to use the soft editing to give the desired results
for overlaps and paddings.

Our suggestion is to support your work with modifiers to have a more parametric approach to the modelling. This will allow you to smooth out meshes with subdivision surfaces, increase the resolution of the original mesh or project meshes one on top of each other. Please refer to the reference documentation for botcha for more info.

Jumping between the two mapping (heel and vamp) and 3D and 2D allow you to quickly achieve great results with very clean geometry.
Unwrapping and UV creation
Once we have modelled the parts we want to add UVs to them to get the best result when
applying materials. Even if a mesh/subD will not need UVs in general our suggestion is always
to create some. With botcha that is quite easy via the B_Unwrap ![]() command. Having UV will allow other 3D applications to compute better additional attributes for
the given mesh (e.g. tangent space for normal maps)
command. Having UV will allow other 3D applications to compute better additional attributes for
the given mesh (e.g. tangent space for normal maps)
Tip
If you have parts that overlap where you want to model something similar to welding or
other effects where there should be texture continuity between the two parts you can use
the B_TransferUVs ![]() command to get results
similar to what you see below:
command to get results
similar to what you see below:

When then applying a texture, it can be modulated with different intensities on different materials and achieve interesting results like these:

Once the UV coordinates have been generated, we may want to apply a material or texture to the object.
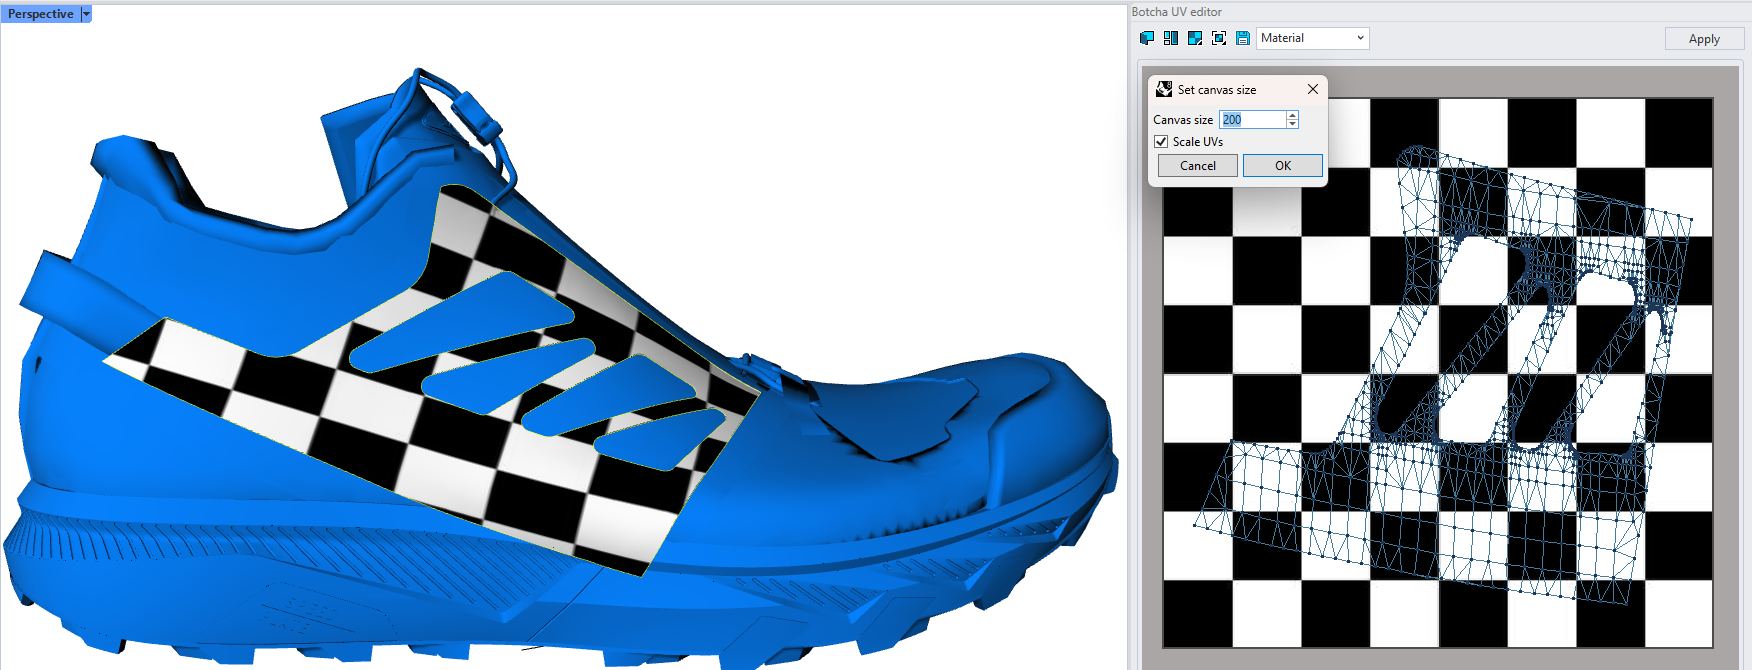
We use B_ScaleUvCanvas to set the appropriate canvas size based on the physical dimensions of the material.
For example, if you have a 200×200 mm texture (or whatever unit your model uses) and you digitize it,
you should set the Canvas Size in the UV Editor to 200.
If you change the Canvas size and set it to 500, maybe because you decided that your material is 500x500, the visual result will be different: the material is bigger, so a smaller piece of it will be visibile on the object.
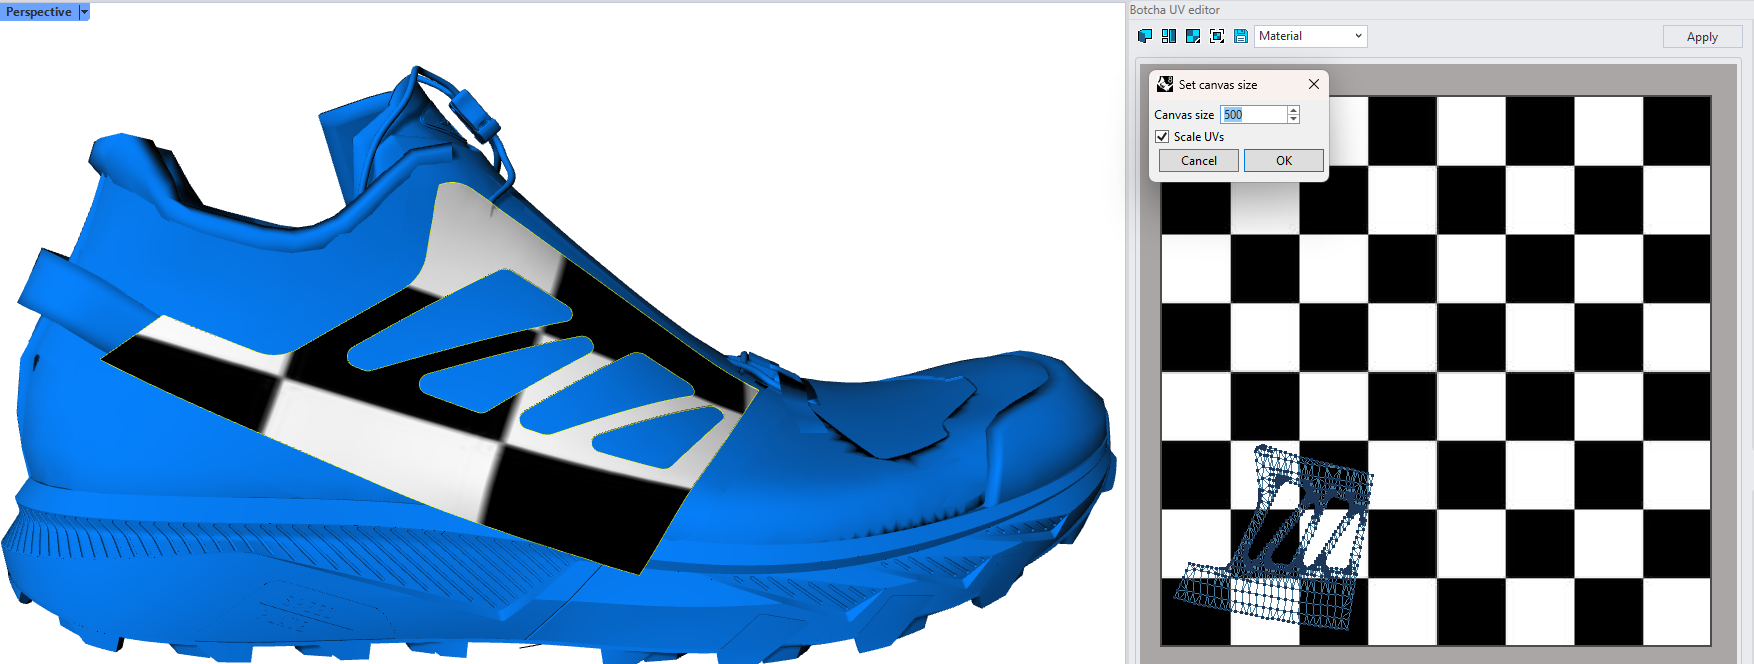
If you are not satisfied with the result, you can use B_Unwrap again to obtain
new coordinates already scaled basing on the setted Canvas size.
Stitches and laces
To finish our part creation with some detailing we want to add some stitching and lacing. These can help with adding realism even when the model does not have the full detailing.
First we want to create some stitching using the dedicated panel ![]() .
In the panel you will have a number of options by default and you can create more and add to the
library, export said library or import one created by somebody else. To create a stitching you simply
select the type of stitch to apply, double click on it and then select where to put it and which
line to follow.
.
In the panel you will have a number of options by default and you can create more and add to the
library, export said library or import one created by somebody else. To create a stitching you simply
select the type of stitch to apply, double click on it and then select where to put it and which
line to follow.

Second we want to create some laces. We strongly suggest to create the laces directly in 3D to
have the best results. First we want to right click on the lacing icon in the toolbar
![]() or run the
or run the B_LacesConstraints command to setup the
constraints for the laces. These constraints will be the support on which the lacing will be built.
Tip
We suggest to use a complete mesh that have polygons on all the area where the laces will run, this will allow better flow of the laces in general. This surface can either be the original last or an ad-hoc created surface.
Once we have our constraints we can use B_LacesCreate command to create the overall lacing. The
command will allow you to connect each constraint to the next one with the selected lacing,

The final result when having applied some stitches and lacing gives some more life to the shoe and sell you model better.
